Security Settings
Configure security options for your chat widget including pre-chat forms and identity verification.
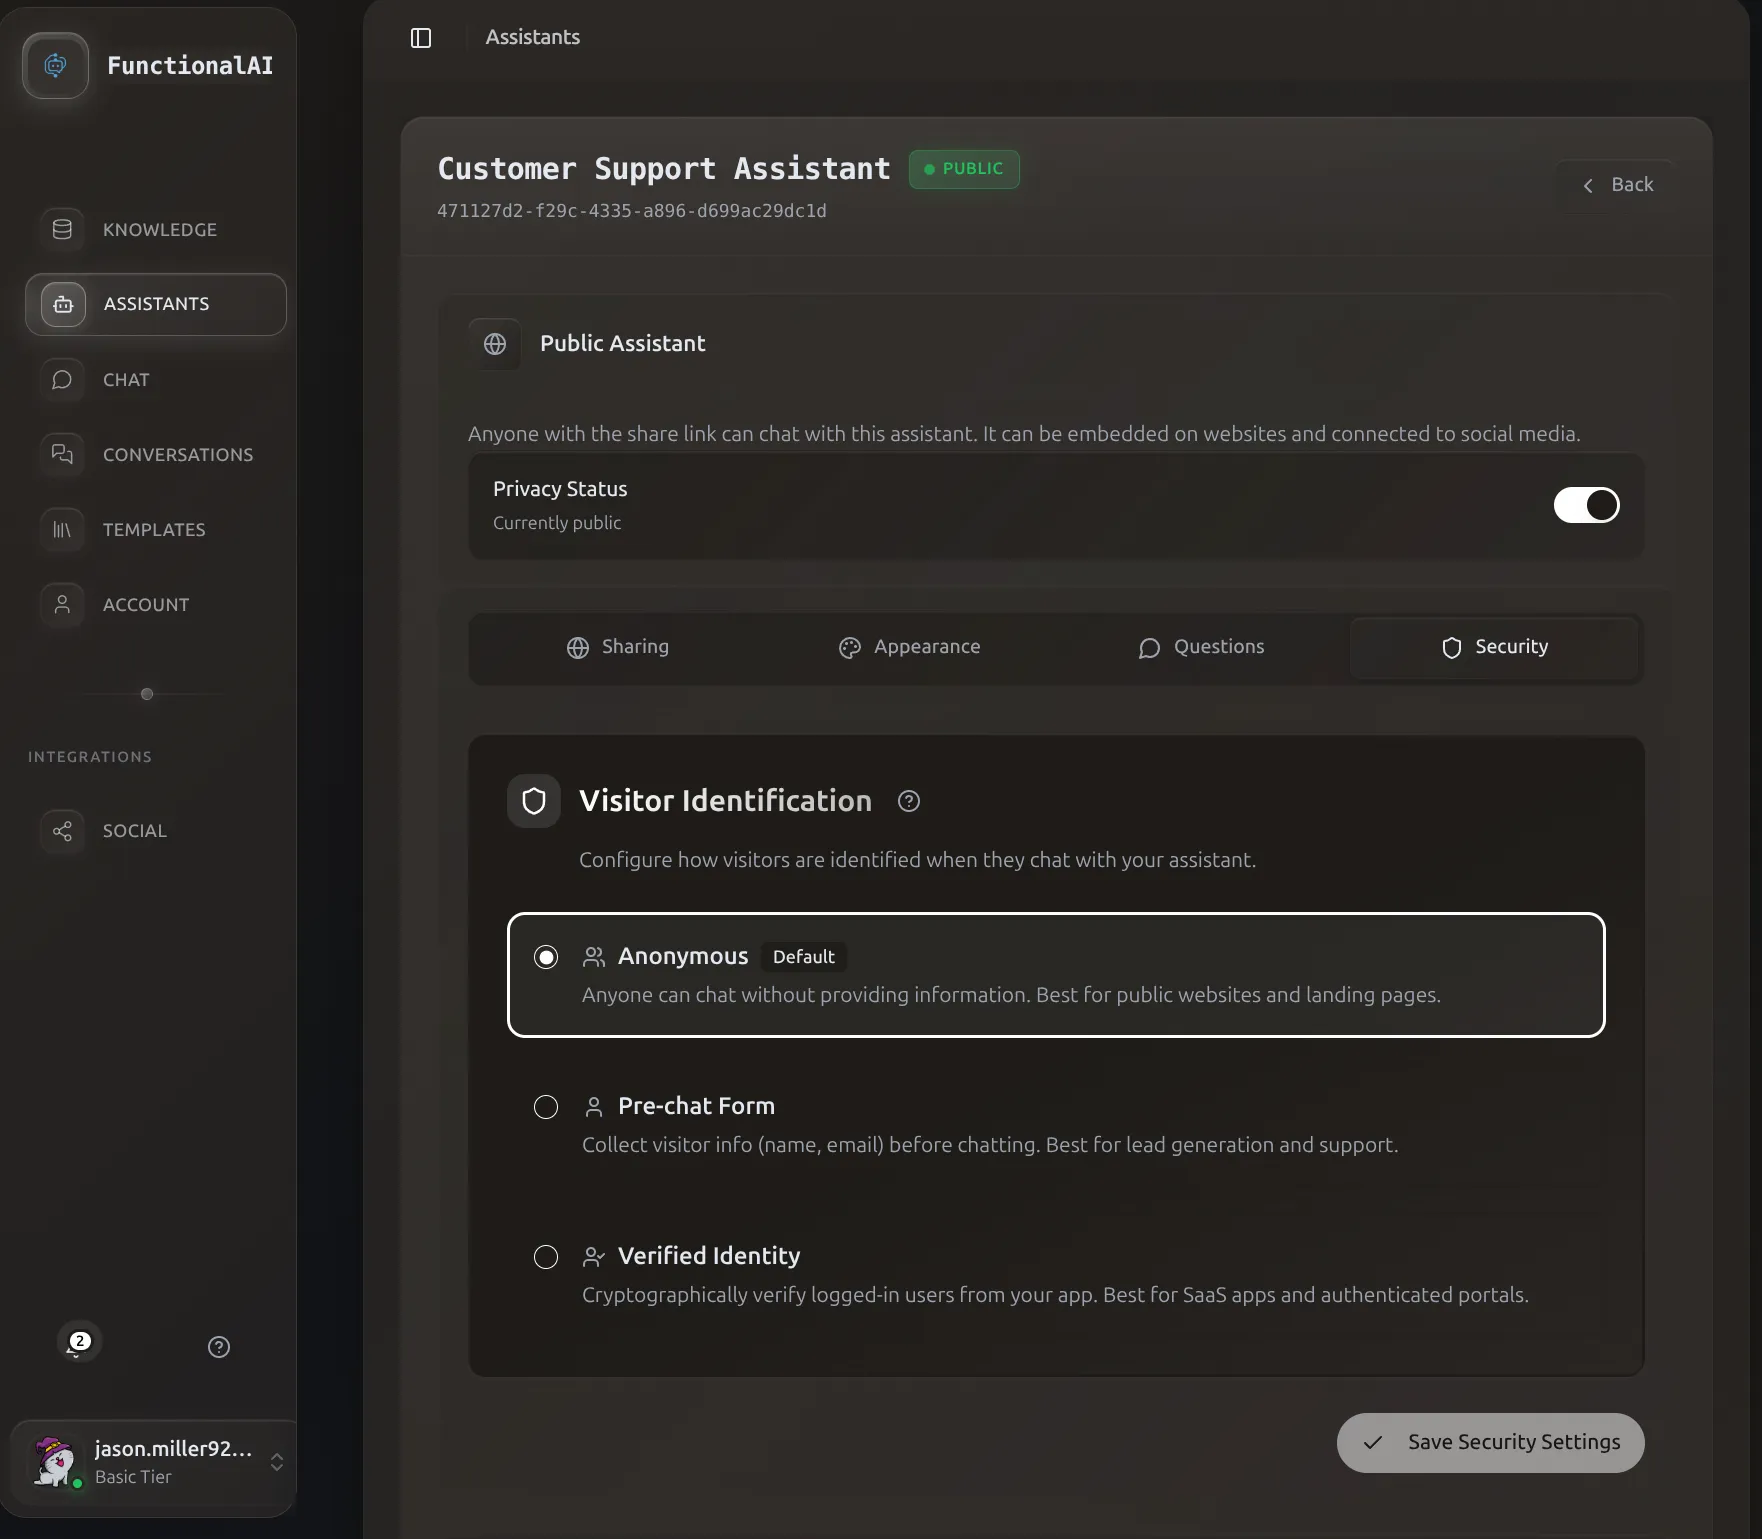 The Security tab lets you choose between Anonymous, Pre-Chat Form, or Verified Identity modes.
Overview
Security settings control how users identify themselves before chatting with your assistant. Choose the right level based on your needs:
| Mode | Security Level | User Experience | Best For |
|---|---|---|---|
| Anonymous | Basic | Instant chat, no barriers | Public support, casual Q&A |
| Pre-Chat Form | Medium | Quick form before chat | Lead generation, basic identification |
| Identity Verification | High | Cryptographic verification | Authenticated users, sensitive data |
Anonymous Mode
The default mode allows anyone to chat without identification.
Behavior
- Users click the widget and start chatting immediately
- No personal information required
- Conversations identified by session ID
- Best for general support and public information
When to Use
- Public FAQ or support bots
- Product information assistants
- When quick access is more important than identification
- Initial testing and development
Limitations
- Can't personalize responses to specific users
- No way to follow up via email
- Harder to track individual user journeys
Pre-Chat Form
Collect basic user information before the conversation starts.
How It Works
- User clicks the chat widget
- A form appears asking for information (name, email, etc.)
- User submits the form
- Chat begins with user identity attached to the conversation
Configuration
- Go to Assistants > Manage Assistant
- Open Security Settings or Pre-Chat Form
- Enable pre-chat form
- Select fields to collect:
- Name (optional/required)
- Email (optional/required)
- Phone (optional/required)
- Custom fields
Best Practices
Keep it minimal: Only ask for information you'll actually use. Every additional field reduces completion rates.
Explain the value: Tell users why you're asking for their information (e.g., "Enter your email so we can follow up if needed").
Match the context: A support bot might need email for follow-up, but a product FAQ bot might not need any identification.
Use Cases
- Lead Generation
- Collect email addresses from interested prospects for follow-up
- Support Requests
- Get customer email to send transcripts or follow up on unresolved issues
- Personalization
- Address users by name for a more personal experience
Identity Verification (HMAC)
For applications where users are already logged in, verify their identity cryptographically to prevent impersonation.
Why Use Identity Verification?
When your users are logged into your website or app:
- Prevent spoofing: Users can't pretend to be someone else
- Access user data: Safely personalize responses based on verified identity
- Compliance: Meet security requirements for handling personal data
- Trust: Users know conversations are tied to their real account
How HMAC Verification Works
HMAC (Hash-based Message Authentication Code) uses a shared secret to verify user identity:
- User logs into your site with their email
- Your server generates an HMAC using the user's email and your secret key
- Widget includes the HMAC when connecting
- We verify the HMAC matches the email using the same secret
- If valid, the conversation is tied to that verified user
Setup Steps
Step 1: Get Your Secret Key
- Go to Assistants > Manage Assistant
- Open Security Settings
- Find your HMAC Secret Key
- Copy it securely (never expose this publicly)
Keep Your Secret Key Safe
The HMAC secret key must be kept on your server only. Never include it in client-side JavaScript, commit it to version control, or share it publicly.
Step 2: Generate HMAC on Your Server
Generate the HMAC server-side before rendering the page with the chat widget.
import hmac
import hashlib

def generate_chat_hmac(user_email: str, secret_key: str) -> str:
    """Generate HMAC for chat widget identity verification."""
    message = user_email.encode('utf-8')
    secret = secret_key.encode('utf-8')
    signature = hmac.new(secret, message, hashlib.sha256)
    return signature.hexdigest()

# Usage
secret_key = "your-hmac-secret-key"  # From assistant settings
user_email = "user@example.com"       # Currently logged-in user
hmac_signature = generate_chat_hmac(user_email, secret_key)
const crypto = require('crypto');

function generateChatHmac(userEmail, secretKey) {
  return crypto
    .createHmac('sha256', secretKey)
    .update(userEmail)
    .digest('hex');
}

// Usage
const secretKey = 'your-hmac-secret-key';
const userEmail = 'user@example.com';
const hmacSignature = generateChatHmac(userEmail, secretKey);
Step 3: Pass to Widget
Include the HMAC and email when rendering the chat widget. The widget uses your assistant ID in the URL:
<script async
  src="https://api.functional-ai.com/shared-chat/widget-script/YOUR_ASSISTANT_ID/"
  data-user-identifier="user@example.com"
  data-hmac-signature="generated-hmac-signature">
</script>
Replace YOUR_ASSISTANT_ID with your actual assistant ID (found in the embed code on the Sharing tab).
Verification Flow
┌─────────────────────────────────────────────────────────────────┐
│                    YOUR INFRASTRUCTURE                          │
├─────────────────────────────────────────────────────────────────┤
│  1. User logs in    2. Backend generates     3. Frontend gets   │
│     to your site       HMAC signature           signature       │
│         ↓                    ↓                      ↓           │
│    [Login Form]    →  [Your Server]    →    [Your Frontend]    │
│                      (secret stored here)    (NO secret here)   │
└─────────────────────────────────────────────────────────────────┘
                                    ↓
                    4. Widget sends email + signature
                                    ↓
┌─────────────────────────────────────────────────────────────────┐
│                    FUNCTIONAL AI                                │
│         5. We verify signature → Identity confirmed             │
└─────────────────────────────────────────────────────────────────┘
Full Integration Examples
The examples above show the individual pieces. Here's how to wire them together for complete working integrations.
Choose Your Architecture
Pick the example that matches how your application is built:
- Server-Rendered Apps: Django, Rails, PHP, Express with templates
- Single Page Apps (SPAs): React, Vue, Next.js, Angular
Option A: Server-Rendered Apps
For traditional server-rendered applications, generate the signature when rendering the page and inject it directly into the template.
Backend (Django example):
# views.py
import hmac
import hashlib
import os
from django.shortcuts import render
from django.contrib.auth.decorators import login_required

@login_required
def chat_page(request):
    """Render page with chat widget - signature generated server-side."""
    secret = os.environ["HMAC_SECRET"]
    email = request.user.email
    signature = hmac.new(
        secret.encode(),
        email.encode(),
        hashlib.sha256
    ).hexdigest()

    return render(request, 'chat.html', {
        'user_email': email,
        'hmac_signature': signature,
    })
Template (chat.html):
<!-- The signature is rendered directly into the HTML -->
<script async
  src="https://api.functional-ai.com/shared-chat/widget-script/YOUR_ASSISTANT_ID/"
  data-user-identifier="{{ user_email }}"
  data-hmac-signature="{{ hmac_signature }}">
</script>
Express.js + EJS equivalent:
// routes/chat.js
const crypto = require('crypto');

app.get('/chat', requireAuth, (req, res) => {
  const secret = process.env.HMAC_SECRET;
  const signature = crypto
    .createHmac('sha256', secret)
    .update(req.user.email)
    .digest('hex');

  res.render('chat', {
    userEmail: req.user.email,
    hmacSignature: signature
  });
});
<!-- views/chat.ejs -->
<script async
  src="https://api.functional-ai.com/shared-chat/widget-script/YOUR_ASSISTANT_ID/"
  data-user-identifier="<%= userEmail %>"
  data-hmac-signature="<%= hmacSignature %>">
</script>
Option B: Single Page Apps (SPAs)
For SPAs, create a backend API endpoint that returns the signature, then fetch it from your frontend.
Backend API endpoint (Django REST Framework):
# your_app/views.py
from rest_framework.decorators import api_view, permission_classes
from rest_framework.permissions import IsAuthenticated
from rest_framework.response import Response
import hmac
import hashlib
import os

@api_view(['GET'])
@permission_classes([IsAuthenticated])
def get_chat_signature(request):
    """Return HMAC signature for authenticated user."""
    secret = os.environ["HMAC_SECRET"]
    email = request.user.email
    signature = hmac.new(
        secret.encode(),
        email.encode(),
        hashlib.sha256
    ).hexdigest()

    return Response({
        "email": email,
        "signature": signature
    })
# urls.py
urlpatterns = [
    # ... other routes
    path('api/chat-signature/', get_chat_signature, name='chat-signature'),
]
Frontend component (React/Next.js):
// components/ChatWidget.tsx
import { useEffect, useState } from 'react';

interface ChatWidgetProps {
  authToken: string;  // Your app's auth token
  assistantId: string;  // Your Functional AI assistant ID
}

export function ChatWidget({ authToken, assistantId }: ChatWidgetProps) {
  const [signature, setSignature] = useState<string | null>(null);
  const [email, setEmail] = useState<string | null>(null);

  // Fetch signature from YOUR backend (not ours!)
  useEffect(() => {
    if (!authToken) return;
    fetch('/api/chat-signature/', {
      headers: {
        'Authorization': `Bearer ${authToken}`
      }
    })
      .then(res => {
        if (!res.ok) throw new Error('Failed to get signature');
        return res.json();
      })
      .then(data => {
        setEmail(data.email);
        setSignature(data.signature);
      })
      .catch(err => {
        console.error('Failed to get signature:', err);
      });
  }, [authToken]);

  // Inject widget once we have signature
  useEffect(() => {
    if (!signature || !email) return;
    if (document.getElementById('chat-widget-script')) return;

    const script = document.createElement('script');
    script.id = 'chat-widget-script';
    script.src = `https://api.functional-ai.com/shared-chat/widget-script/${assistantId}/`;
    script.async = true;
    script.setAttribute('data-user-identifier', email);
    script.setAttribute('data-hmac-signature', signature);
    document.body.appendChild(script);

    return () => script.remove();
  }, [signature, email, assistantId]);

  return null; // Widget injects itself
}
Usage in your app:
// pages/dashboard.tsx
import { ChatWidget } from '../components/ChatWidget';
import { useAuth } from '../hooks/useAuth';

export default function Dashboard() {
  const { token, isAuthenticated } = useAuth();

  return (
    <div>
      <h1>Dashboard</h1>
      {/* Only show widget for authenticated users */}
      {isAuthenticated && (
        <ChatWidget
          authToken={token}
          assistantId="YOUR_ASSISTANT_ID"
        />
      )}
    </div>
  );
}
Key Points
- The secret key NEVER leaves your backend - it's only used server-side
- The frontend only receives the signature - which is safe to expose
- Each signature is tied to a specific email - it can't be reused for other users
Common Issues
HMAC verification failing
Check these items:
- Secret key mismatch: Ensure you're using the exact key from settings
- Email encoding: Use UTF-8, no extra whitespace
- Algorithm: Must be SHA-256 (HMAC-SHA256)
- Output format: Hexadecimal lowercase string
Debug steps:
- Log the email and HMAC on your server
- Verify the email matches exactly what we receive
- Test with a simple email (no special characters)
- Compare HMAC output length (should be 64 hex characters)
When to regenerate HMAC
Generate a new HMAC: - On each page load (recommended for security) - When user logs in or session refreshes - If implementing session-based caching, invalidate when user changes
Handling logged-out users
When users are not logged in: - Don't include user email or HMAC attributes - Widget falls back to anonymous mode - Or hide the widget entirely for logged-out users
Security Recommendations
By Use Case
| Use Case | Recommended Mode |
|---|---|
| Public website FAQ | Anonymous |
| E-commerce product support | Pre-chat form (email) |
| Customer portal support | Identity verification |
| Internal tools | Identity verification |
| Lead generation landing page | Pre-chat form |
| Authenticated mobile app | Identity verification |
General Guidelines
Don't over-secure: If your assistant only provides public information, anonymous mode is fine. Extra security adds friction.
Match your site's security: If users are logged in, use identity verification. If they're not, pre-chat form or anonymous is appropriate.
Consider the data: If the assistant can access or discuss personal information, use identity verification.
Test thoroughly: Before deploying security settings, test all scenarios including edge cases.
Troubleshooting
Pre-chat form not appearing
Check: 1. Form is enabled in assistant settings 2. At least one field is configured 3. Clear browser cache and test in incognito 4. Verify assistant is public
HMAC always failing
Verify: 1. Secret key copied exactly (no extra spaces) 2. Email sent to widget matches email used for HMAC 3. Using SHA-256 algorithm 4. Outputting lowercase hexadecimal 5. Server-side generation (not client-side)
Widget not accepting verified user
Check: 1. Both email AND hmac attributes are present 2. HMAC was generated on current page load 3. User email hasn't changed since HMAC generation 4. No URL encoding issues